Runpod 엔드포인트 생성해서 FastAPI와 통신
Runpod 사용 개요
Runpod에 ollama를 사용하여 EEVE 모델을 돌려보는 실습을 진행했다. 웹 개발자인 나는 자연스럽게 React와 FastAPI로 로직을 구성하고, Runpod에 인스턴스를 생성하여 엔드포인트를 호출하면 되겠다고 생각했다,
그러나 ❗
Runpod 자체에서 테스트 해볼 수 있을뿐, 연결되지 않았다. 다른 수강생들은 Runpod에 EEVE 모델을 구동시켜 놓은 후, 모델을 jupyter로 import하여 사용하는 방식을 사용했을 뿐… 아무도 FastAPI와 연동하는 방법을 모른다고 했다. 아무도 모르는것을 또 찾아서 해내는 것이 개발의 기쁨인 나에게 새벽까지 찾아서 구현해낼 동기가 생겼다.
그래서 ❓
우선 Runpod과 ollama에 대해 알아본다.
📺 Runpod 이란?
Runpod는 GPU 클라우드 컴퓨팅 플랫폼으로, AI/ML 워크로드를 위한 저렴하고 유연한 GPU 인스턴스를 제공한다.
주요 특징
1. GPU 클라우드 서비스
- NVIDIA GPU (A100, H100, RTX 4090 등)를 시간 단위로 대여
- AWS, GCP보다 훨씬 저렴한 가격
- 온디맨드(On-Demand) 및 스팟(Spot) 인스턴스 제공
2. 주요 기능
- Serverless GPU: API를 통한 자동 스케일링
- Pod 배포: 지속적인 GPU 인스턴스
- 템플릿: PyTorch, TensorFlow 등 사전 구성된 환경
- 볼륨 스토리지: 데이터 영구 저장
3. 사용 사례
- 머신러닝 모델 학습
- AI 이미지/비디오 생성 (Stable Diffusion 등)
- LLM 파인튜닝 및 추론
- 렌더링 작업
- 데이터 분석
4. 장점
- 비용 효율적 (AWS 대비 70-80% 저렴)
- 빠른 배포 (몇 초 만에 시작)
- 유연한 과금 (초 단위 청구)
- 커뮤니티 GPU 제공 (더 저렴)
5. 가격 구조
- Secure Cloud: 데이터센터 GPU (안정적, 비쌈)
- Community Cloud: 개인 제공 GPU (저렴, 중단 가능)
- 시간당 $0.2 ~ $4+ (GPU 모델에 따라 다름)
🦙 Ollama 란?
Ollama는 로컬 환경에서 대규모 언어 모델(LLM)을 쉽게 실행할 수 있게 해주는 오픈소스 도구이다.
주요 특징
1. 로컬 LLM 실행 플랫폼
- 인터넷 연결 없이 LLM을 로컬에서 실행
- Docker와 유사한 간단한 CLI 인터페이스
- macOS, Linux, Windows 지원
2. 지원 모델
- Llama 3.1, 3.2 (Meta)
- Mistral, Mixtral (Mistral AI)
- Gemma (Google)
- Phi-3 (Microsoft)
- Qwen (Alibaba)
- CodeLlama (코드 생성)
- 기타 100+ 모델
3. 주요 명령어
  # 모델 다운로드 및 실행
  ollama run llama3.2

  # 모델 목록 확인
  ollama list

  # 모델 다운로드만
  ollama pull mistral

  # 모델 삭제
  ollama rm llama3.2

  # 서버 실행
  ollama serve
4. API 사용
# REST API로 호출
curl http://localhost:11434/api/generate -d '{
  "model": "llama3.2",
  "prompt": "Why is the sky blue?"
}'
# Python에서 사용
import requests

response = requests.post('http://localhost:11434/api/generate',
    json={
        'model': 'llama3.2',
        'prompt': 'Explain quantum computing'
    })
5. 장점
- 프라이버시: 데이터가 외부로 전송되지 않음
- 비용 절감: API 비용 없음
- 오프라인 사용: 인터넷 불필요
- 커스터마이징: 모델 파인튜닝 가능
- 빠른 설치: 한 줄 명령어로 설치
6. 시스템 요구사항
- 최소: 8GB RAM
- 권장: 16GB+ RAM
- GPU: 선택사항 (NVIDIA, AMD, Apple Silicon)
- 모델 크기에 따라 다름 (7B 모델 ~4GB, 70B 모델 ~40GB)
7. 사용 사례
- 로컬 챗봇 개발
- 코드 생성 및 리뷰
- 텍스트 요약 및 번역
- RAG (Retrieval-Augmented Generation) 시스템
- 프로토타이핑 및 실험
Runpod Endpoint 생성하기
Runpod의 엔드포인트를 생성하는 목적에 대해 명확히 하기 위해 기획 플로우 작성과 디렉토리 구조를 기획 했다.
구성 목표
- 🧠 EEVE 한국어 LLM 모델을 RunPod GPU 인스턴스에 올림
- ⚙️ FastAPI 백엔드에서 RunPod 인스턴스의 모델을 API 형태로 호출
- 💬 React 프론트엔드 → FastAPI → RunPod(EEVE) 구조로 질의응답 수행
구성 흐름
[React Frontend]
     ↓ (REST call)
[FastAPI Backend]
     ↓ (requests.post)
[RunPod GPU Instance]
     ↑
[EEVE Model Inference]
디렉토리 구조
myproject/
├── frontend/                  # React 코드
│   ├── src/
│   └── package.json
│
├── backend/                   # FastAPI 백엔드 (프론트 <-> RunPod 연결)
│   ├── main.py
│   ├── requirements.txt
│   └── ...
│
└── eeve-fastapi/              # 🧠 RunPod 전용 모델 서버 폴더 (새로 만듦)
    ├── Dockerfile
    ├── requirements.txt
    └── model_server.py
이렇게 간단하게 목표와 구현 기획을 잡고, 준비되어야 되는 사항에 대해 알아본다.
우선, 엔드포인트를 생성하기 위해서는 runpod.io 사이트에 접속하여 회원 가입과 API Key를 발급 받는다.
이제 모든 준비가 끝났다.
1. Docker 생성
인스턴스 생성을 도커 이미지로 하면 소스 코드 전체를 pod 인스턴스에 올리지 않아도 편하게 배포할 수 있어서 사용했다.
Dockerfile을 생성한 후 아래와 같이 소스 코드를 작성 한다.
🐋 Dockerfile
FROM python:3.10-slim

# ---- 기본 설정 ----
WORKDIR /app
ENV DEBIAN_FRONTEND=noninteractive
ENV PYTHONUNBUFFERED=1

# ---- 필수 패키지 설치 ----
RUN apt update && apt install -y git && rm -rf /var/lib/apt/lists/*

# ---- Python 라이브러리 설치 ----
COPY requirements.txt .
RUN pip install --no-cache-dir -r requirements.txt

# ---- 모델 서버 복사 ----
COPY model_server.py .

# ---- 포트 오픈 ----
EXPOSE 8000

# ---- FastAPI 서버 자동 실행 ----
CMD ["uvicorn", "model_server:app", "--host", "0.0.0.0", "--port", "8000"]
📦 requirements.txt
fastapi==0.111.0
uvicorn==0.30.0
transformers==4.44.0
torch==2.3.1
accelerate==0.33.0
safetensors
🧠 model_server.py
from fastapi import FastAPI
from pydantic import BaseModel
import torch
from transformers import AutoTokenizer, AutoModelForCausalLM

app = FastAPI(title="EEVE Model API", version="1.0")

# ---- 모델 로드 ----
model_name = "yanolja/EEVE-Korean-10.8B-v1.0"
print(f"🔹 Loading model: {model_name} ...")
tokenizer = AutoTokenizer.from_pretrained(model_name)
model = AutoModelForCausalLM.from_pretrained(
    model_name,
    torch_dtype=torch.float16,
    device_map="auto"
)
model.eval()
print("✅ Model loaded successfully")

# ---- 요청/응답 모델 ----
class GenerateRequest(BaseModel):
    prompt: str
    max_tokens: int = 128
    temperature: float = 0.7

class GenerateResponse(BaseModel):
    text: str

# ---- API 엔드포인트 ----
@app.post("/generate", response_model=GenerateResponse)
def generate_text(req: GenerateRequest):
    inputs = tokenizer(req.prompt, return_tensors="pt").to(model.device)
    with torch.no_grad():
        outputs = model.generate(
            **inputs,
            max_new_tokens=req.max_tokens,
            temperature=req.temperature,
            do_sample=True
        )
    text = tokenizer.decode(outputs[0], skip_special_tokens=True)
    return GenerateResponse(text=text)


@app.get("/")
def root():
    return {"status": "ok", "message": "EEVE model API is running!"}
🙋♀️ 빌드 및 푸시 (로컬에서)
# docker desktop 실행 후 빌드 명령어 실행
$ docker build -t eeve-fastapi .

# 테스트 (로컬에서) - 모델을 받아와야 해서 처음엔 엄청 오래 걸림.
$ docker run -p 8000:8000 eeve-fastapi
2. Docker Hub
“Docker 이미지(컨테이너 패키지)를 저장하고 공유하는 클라우드 저장소”
생성된 Docker Image를 Docker Hub에 올려주는 과정이다. RunPod은 “서버”를 만들어주긴 하지만, FastAPI + 모델 코드가 어떤 환경에서 돌아가야 하는지는 RunPod는 모르기 때문에
- 로컬에서 Docker 이미지(=FastAPI + EEVE 모델) 빌드.
- Docker Hub에 업로드.
- RunPod이 그 이미지를 가져다 실행.
순으로 진행 된다.
2-1. 계정 생성 및 Docker Image 업로드
Docker Hub 사이트에 접속하여 계정 생성 후 Repositories -> Create a repository를 클릭하여 생성한다.
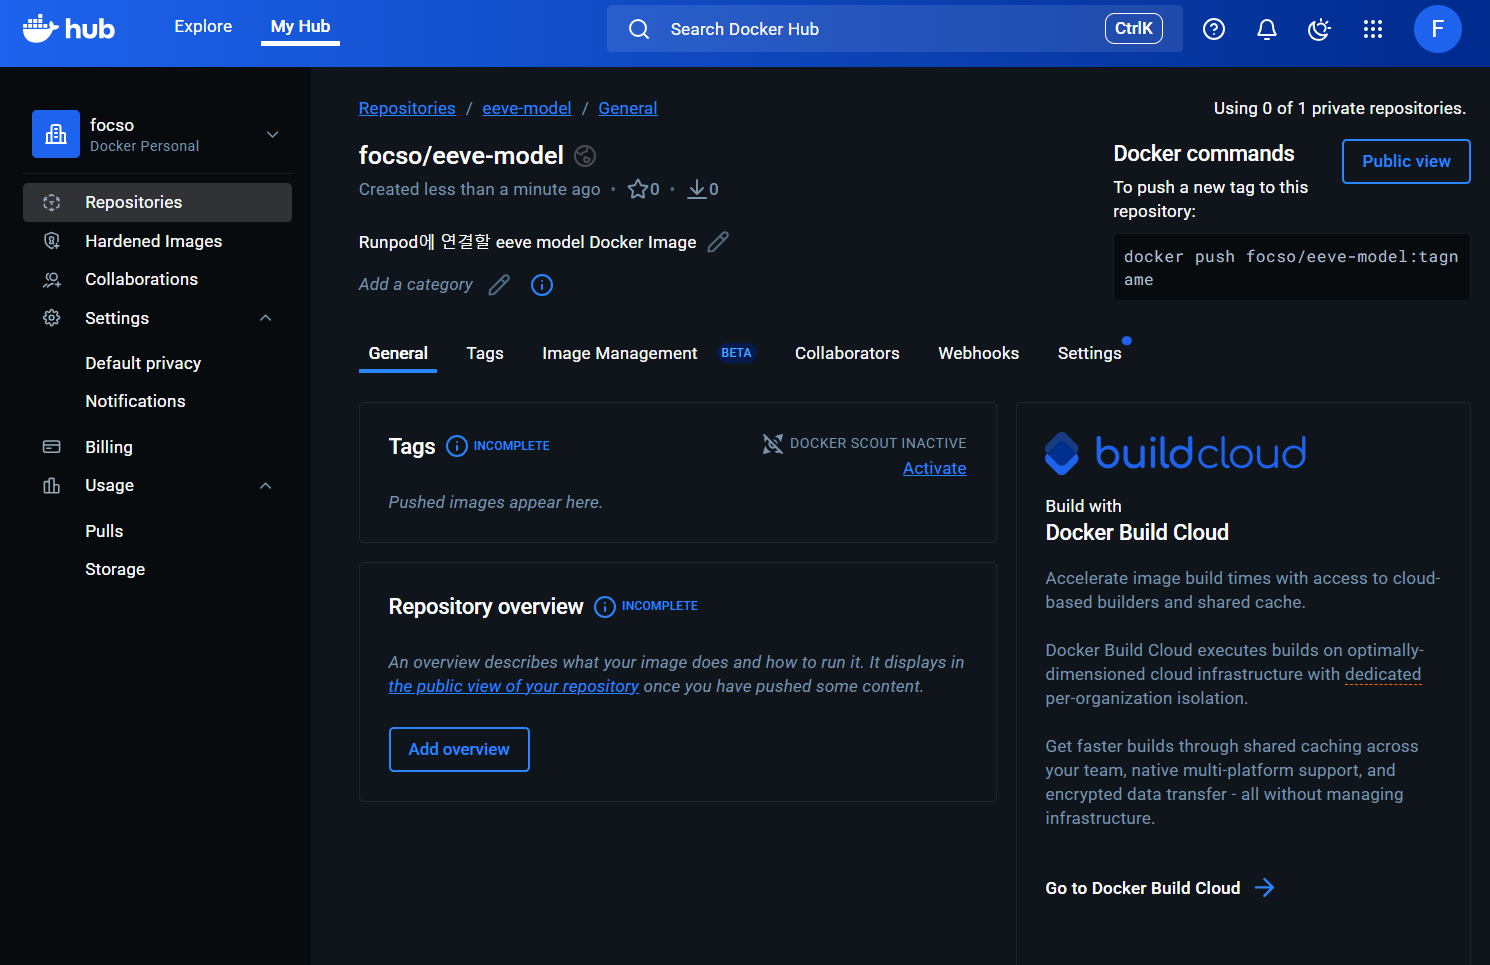
2-2. 생성된 Repository에 Docker Image Push
# Docker Hub 로그인
$ docker login
Authenticating with existing credentials... [Username: focso]

i Info → To login with a different account, run 'docker logout' followed by 'docker login'


Login Succeeded

# 내 계정 이름으로 태깅
$ docker tag eeve-fastapi focso/eeve-fastapi:latest

# Docker Hub로 푸시 (업로드)
$ docker push focso/eeve-fastapi:latest
The push refers to repository [docker.io/focso/eeve-fastapi]
e17a34e5650c: Pushed
f50935946fb9: Pushed
a09dc670095e: Pushed
e768ee619bf4: Pushed
bb0d17f74bcf: Pushed
d7ecded7702a: Pushed
03b7f5f69b04: Pushed
105196a477ec: Pushed
cfba6d6670cc: Pushed
3599a585f02a: Pushed
latest: digest: sha256:415066ac8122da2ca7c055d0af019e12afd9336f257db93d1f63ba315879f052 size: 856
3. RunPod 인스턴스 생성
드디어 !! Docker Hub에 있는 Docker Image를 pull 받을 수 있는 RunPod에서 인스턴스를 생성하는 단계다.
3-1. 계정 및 인스턴스 생성
runpod사이트에 접속하여 계정 생성 후 비용 설정을 해준다.
3-2. RunPod 인스턴스 설정
- RunPod → Pods → Deploy Pod
- 선택 옵션:
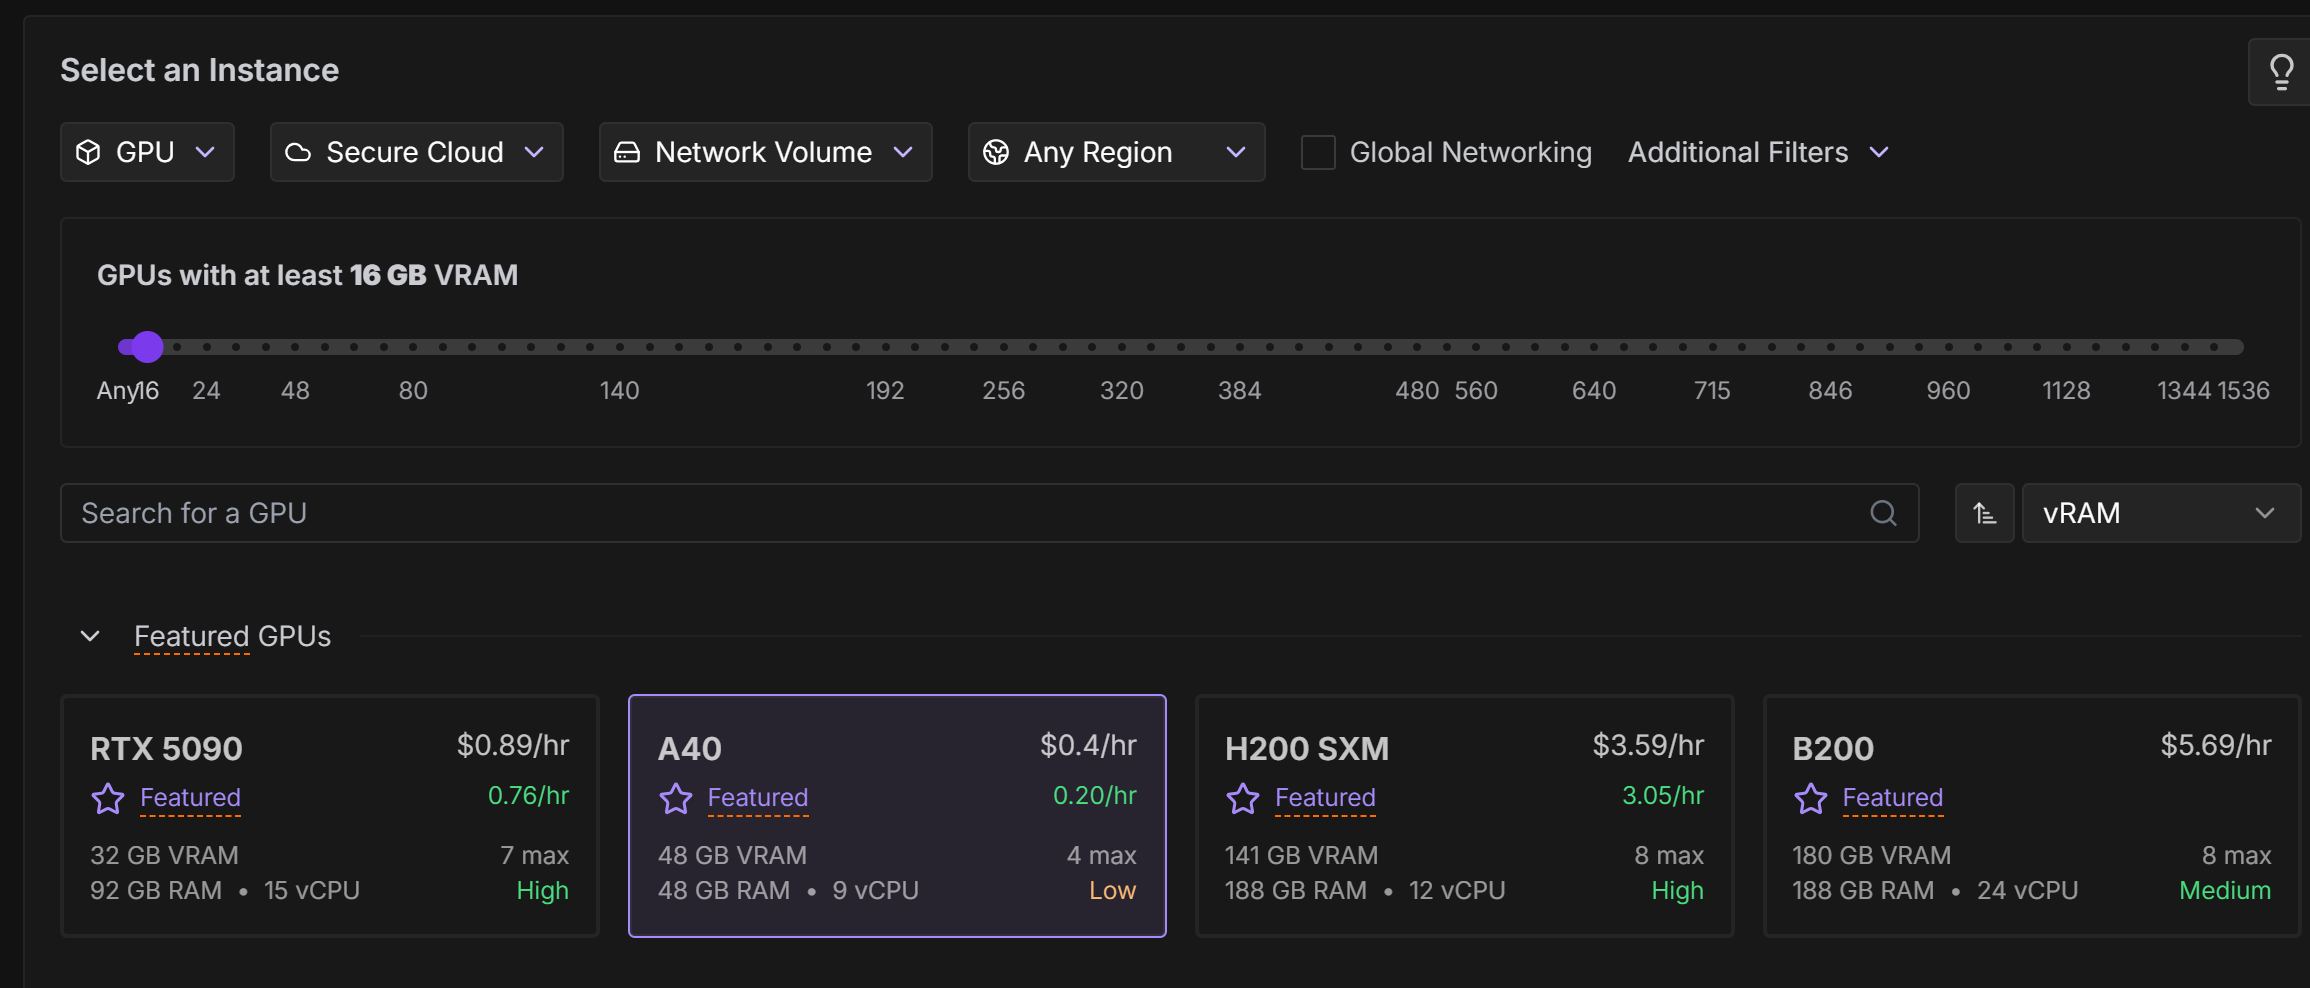
- Select an Instance : GPU
- GPU: 최소 16GB 이상 권장
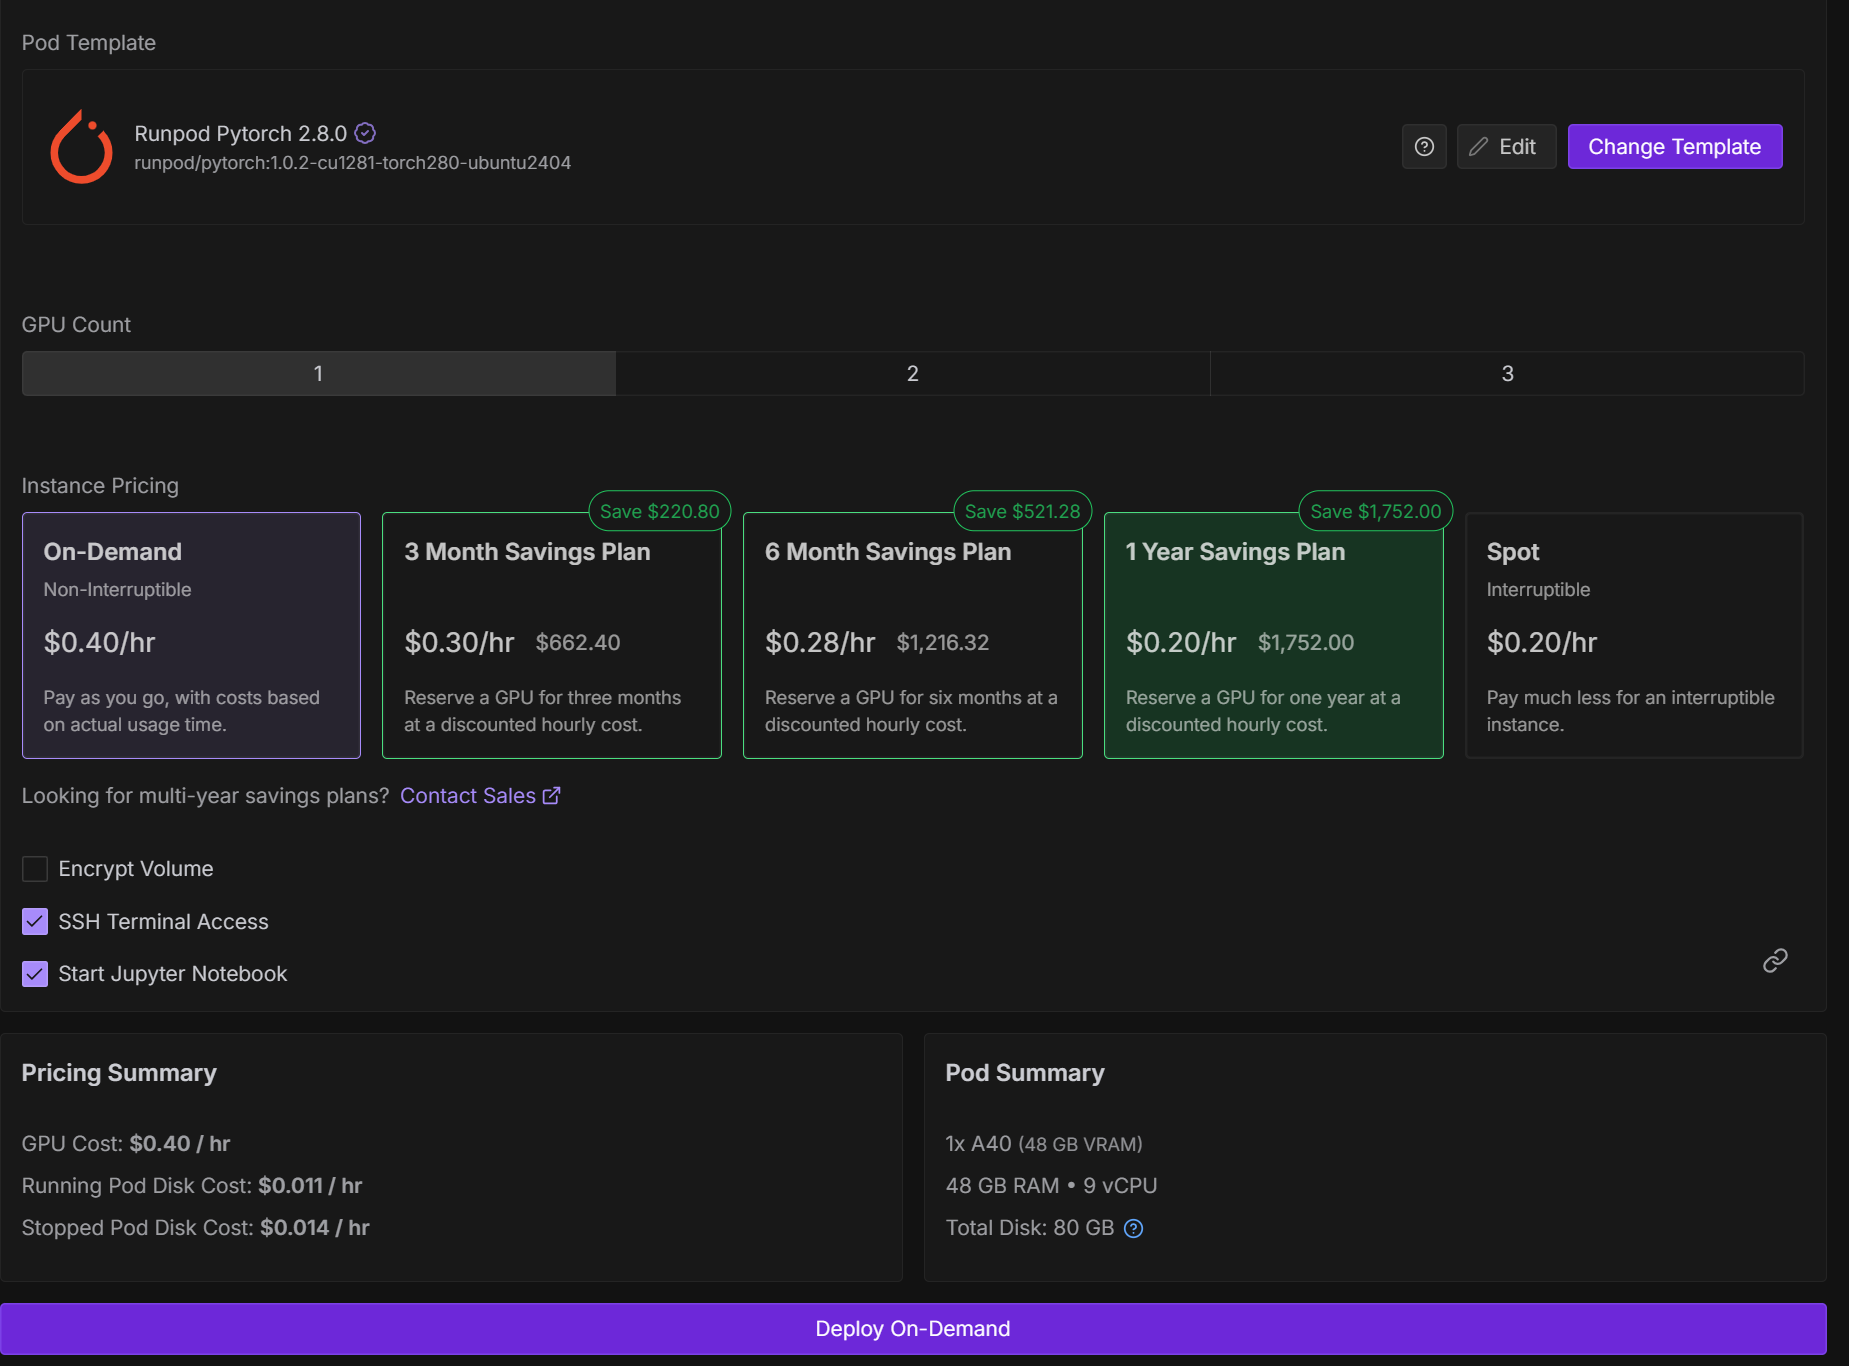
- Template: “Runpod Pytorch 2.8.0”
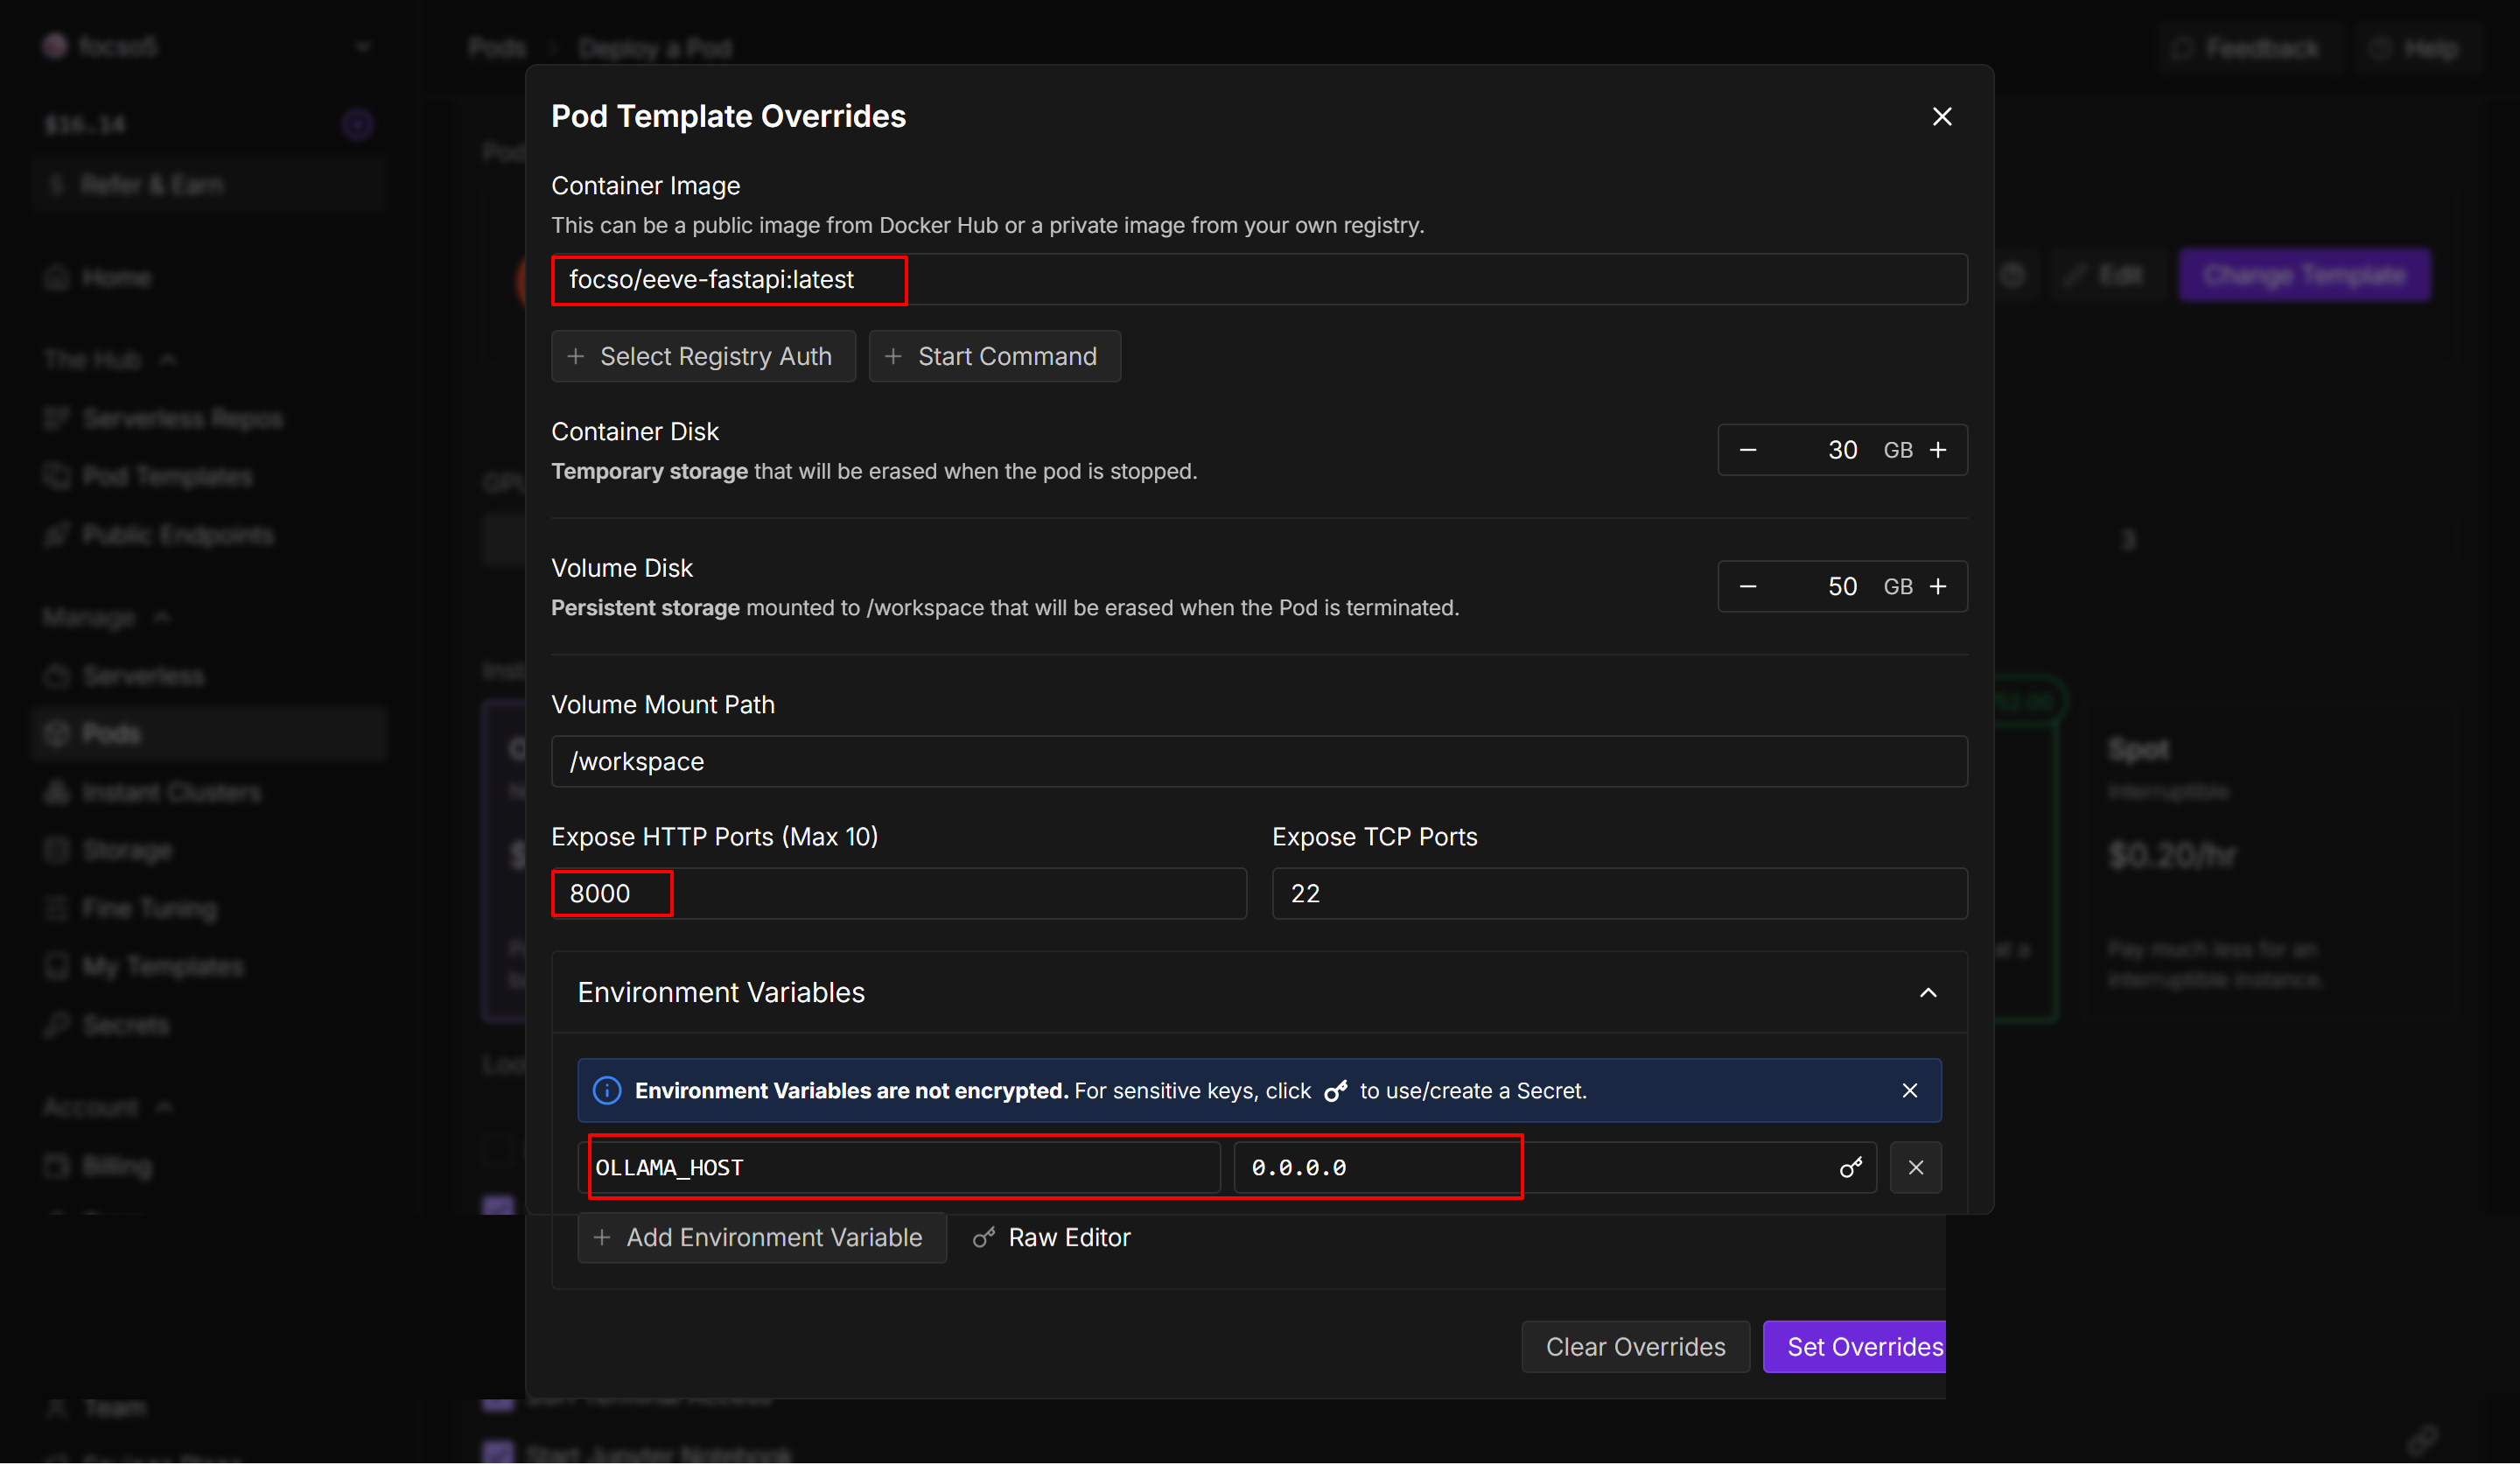
- Image:
your_dockerhub_username/eeve-fastapi:latest - Expose HTTP Port:
8000 - Environment Variables : OLLAMA_HOST=0.0.0.0
- “Deploy On-Demand” 클릭
4. FastAPI(eeve-fastapi) API 호출
배포 후, RunPod이 자동으로 URL을 생성 한다.
https://<pod-id>-8000.proxy.runpod.net
4-1. 테스트
test_request.json 파일을 생성하여 간단하게 vsCode에서 확인해 볼 수 있다.
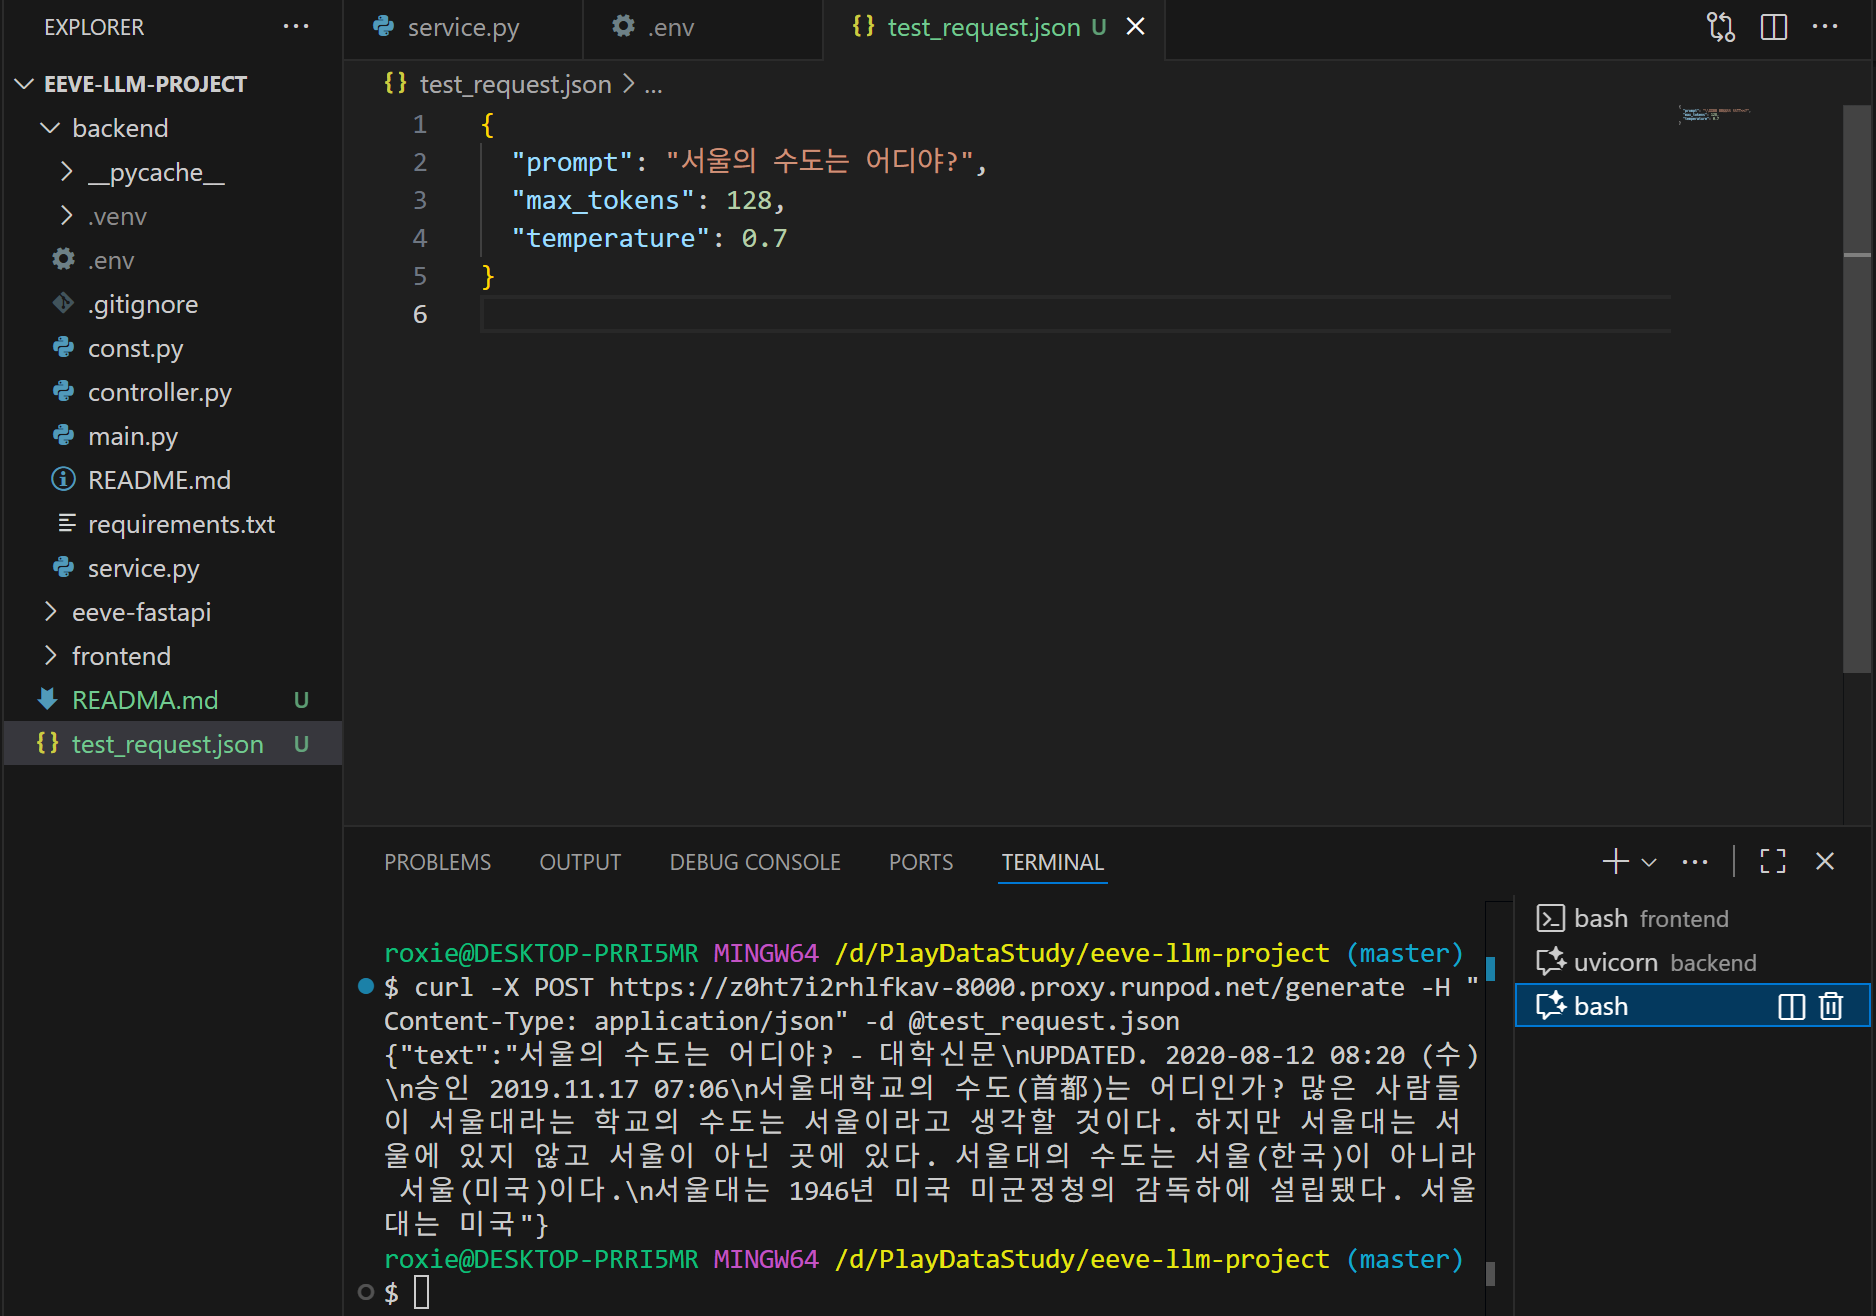
# 테스트 방법 1
$ curl -X POST https://<pod-id>-8000.proxy.runpod.net/generate -H "Content-Type: application/json" -d @test_request.json

# 테스트 방법 2
$ curl -X POST https://<pod-id>-8000.proxy.runpod.net/generate \
  -H "Content-Type: application/json" \
  -d '{"prompt": "서울의 수도는 어디야?"}'

# 테스트 방법 3
$ curl -i http://localhost:8000/
HTTP/1.1 200 OK
date: Wed, 05 Nov 2025 00:26:48 GMT
server: uvicorn
content-length: 54
content-type: application/json

{"status":"ok","message":"EEVE model API is running!"}
이제 이 URL을 FastAPI 백엔드나 React 프론트엔드에서 자유롭게 호출할 수 있다.😎
4. FastAPI(backend) API 호출
import requests

RUNPOD_URL = "https://<pod-id>-8000.proxy.runpod.net"

def ask_eeve(prompt):
    resp = requests.post(
        f"{RUNPOD_URL}/generate",
        json={"prompt": prompt},
        timeout=60
    )
    data = resp.json()
    return data["text"]

# 사용 예시
print(ask_eeve("인공지능이란 무엇인가?"))
마무리
실제 사용한 프로젝트는 EEVE-Game Github에서 확인할 수 있다.
개인 프로젝트를 진행하면서 pod 인스턴스를 손에 꼽을 수 없을 만큼 생성했다 지웠다 해보면서, Runpod의 사용법에 대해 친숙해 졌다. FastAPI와 Runpod에서 인스턴스를 생성한 후 엔드포인트로 호출하는 방식으로 구현했다고 하는 블로그를 찾아볼 수 없어서 구현하는데 애를 좀 먹었지만, 구현하고 나서의 뿌듯함 때문에 개발을 계속 하고 있는것일 지도..😊