첫 해커톤 도전기(2)
미션을 수행하기에 앞서 기본적으로 팀명과 디렉토리 구조를 논의하고, 각자 MCP와 FastMCP에 대해 공부해보기로 했다.
팀명은 AnthropicME🏆🙋로, Anthropic에서 주최하는 해커톤에서 우리가 참가미션을 통과하여 결과적으로는 우리 팀을 픽 해주었으면 하는 염원이 들어있는 팀명이다.
MCP와 FastMCP 개념
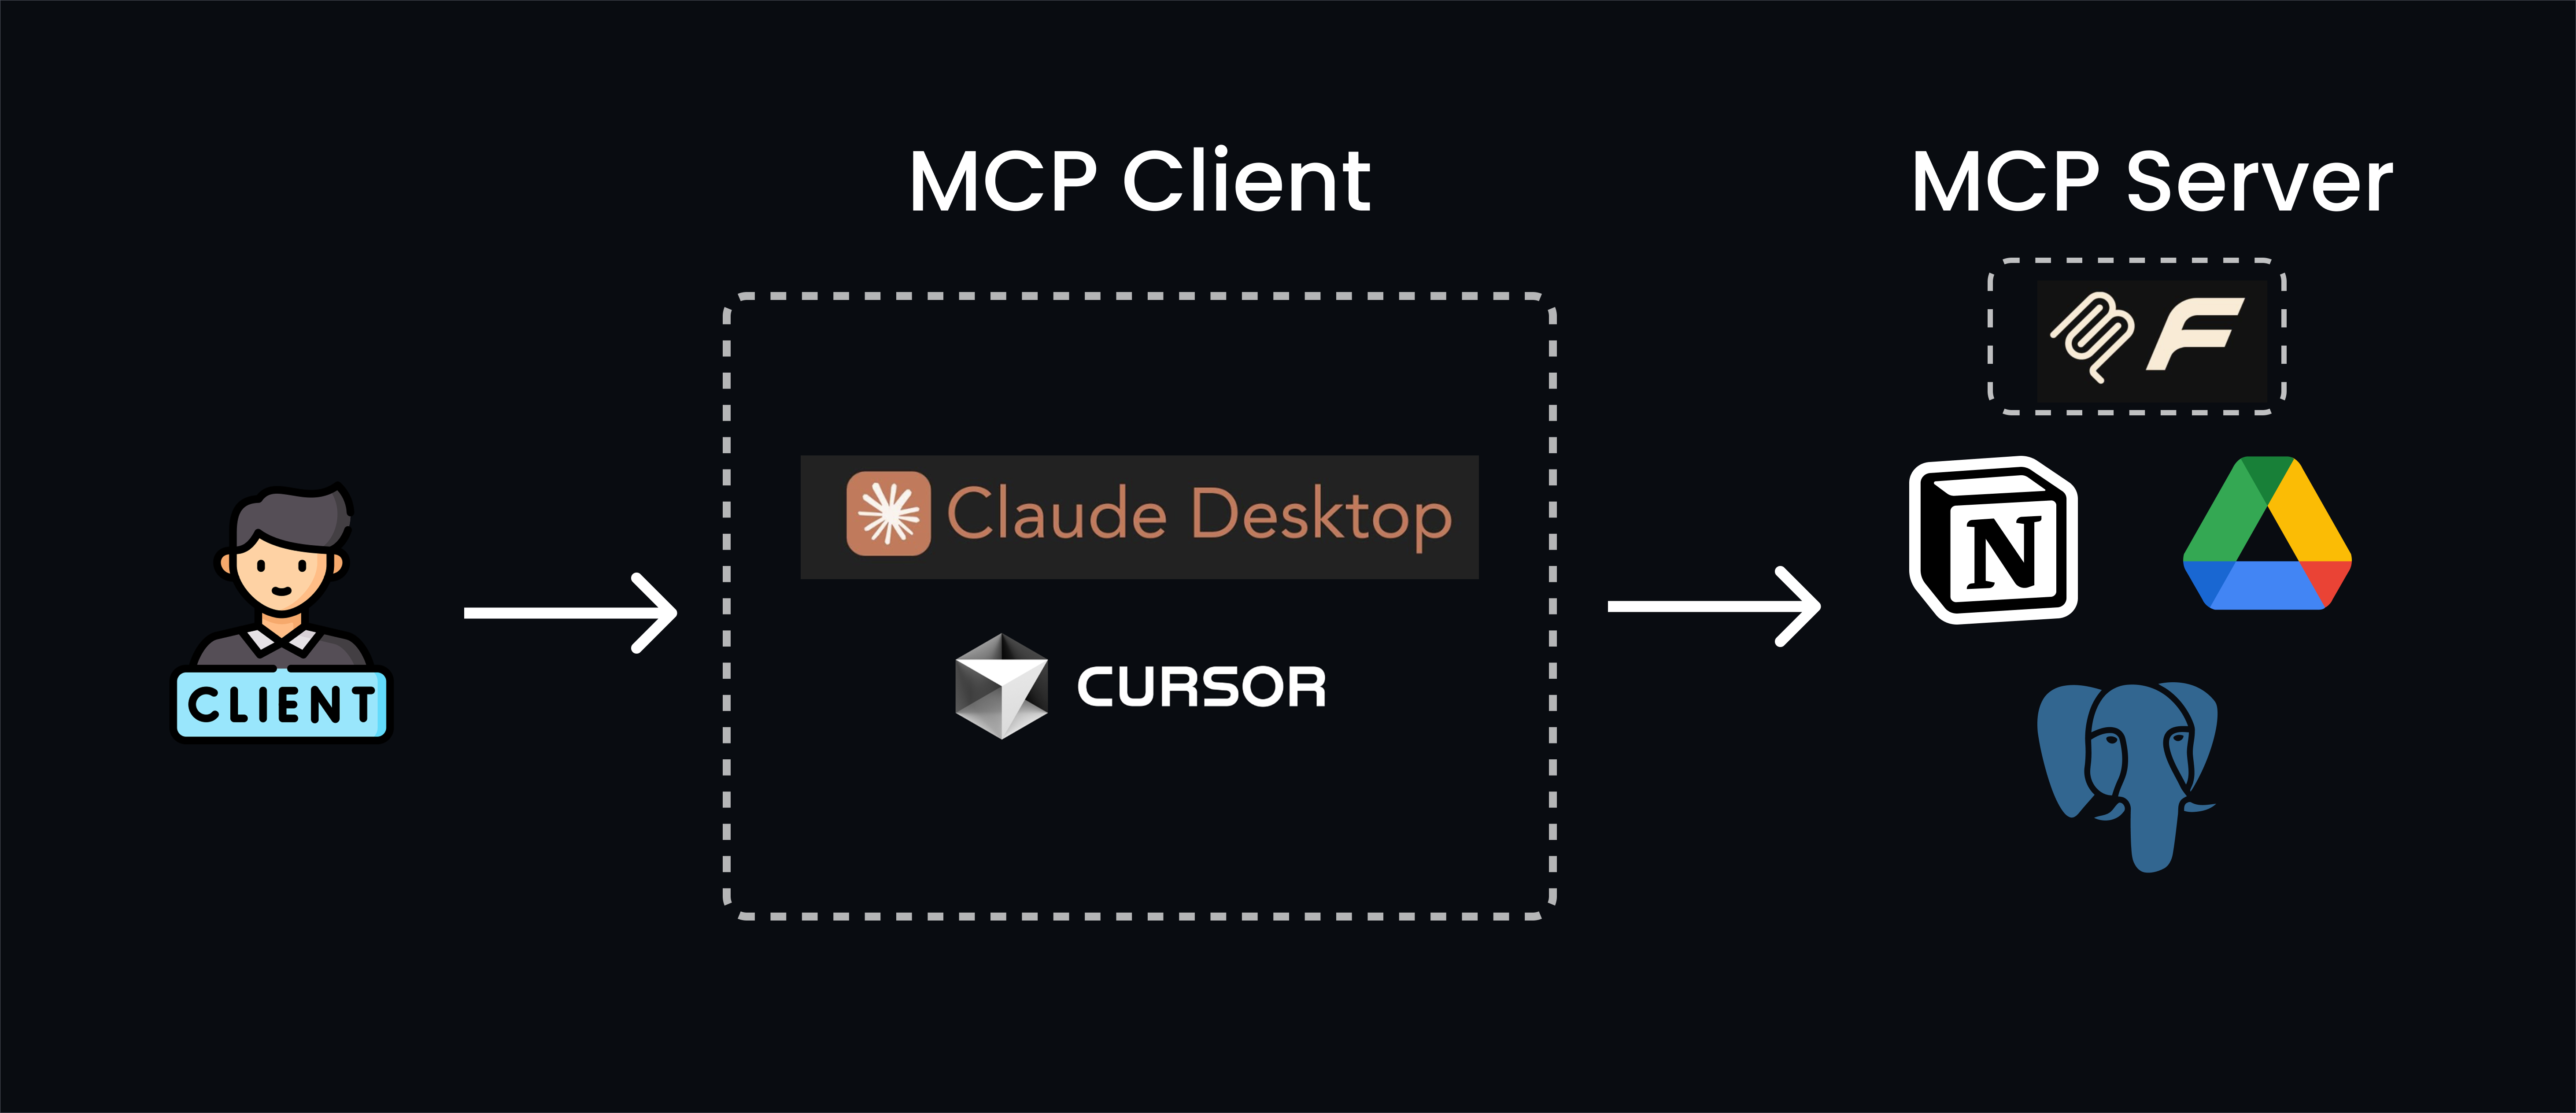
MCP(Model Context Protocol) 란?
LLM 애플리케이션에 데이터와 기능을 안전하고 표준화된 방식으로 노출하는 서버를 구축할 수 있게 하는 Anthropic에서 만든 AI 표준 프로토콜로, “AI를 위한 USB-C 포트”로 비유된다.
MCP Server는 github-mcp-server, mcp-server, Smithery, Context7 등의 사이트에서 다른 사용자들이 만들어 놓은 서버를 가져다 쉽게 사용할 수 있다. 자세한 내용은 아래 내용에서 확인 할 수 있다.
FastMCP란?
FastMCP는 Model Context Protocol(MCP) 서버를 빠르고 쉽게 구축할 수 있는 Python/TypeScript 프레임워크이다.
정리를 해보면,
MCP: AI 표준 프로토콜FastMCP: MCP Server를 구축하는 Python 프레임워크 이라고 할 수 있다.
FastMCP로 MCP Server 생성
디렉토리 구조
🏆anthropic-me/
   ├── state.py    # 상태관리
   ├── modules/    # 기능
   │     ├── 기본휴식/
   │     │       ├── 농땡이1.py
   │     │       └── 농땡이2.py
   │     └── 고급휴식/
   │             ├── 고급농땡이1.py
   │             └── 고급농땡이2.py
   ├── main.py
   ├── README.md
   └── requirements.txt
환경 셋팅
- Windows + Git Bash 환경
# Python 3.11로 가상환경 생성
$ uv python install 3.11
$ uv venv --python 3.11

$ uv pip install flask
$ uv pip freeze > requirements.txt

# pyproject.toml 파일 생성
# 기본 가상환경(.venv) 자동 설정
# uv.lock 파일로 의존성 고정
$ uv init

# FastMCP 설치
$ uv pip install -U fastmcp


# 의존성 설치
$ pip install -r requirements.txt

# FastMCP 가상환경에서 실행
$ source .venv/Scripts/activate && python main.py
| 사용 환경 | 실행할 명령어 |
|---|---|
| PowerShell | .venv\Scripts\Activate.ps1 |
| CMD | .venv\Scripts\activate.bat |
| WSL / Git Bash / macOS / Linux | source .venv/bin/activate |
Server 구현 하기
# state.py

from dataclasses import dataclass, field
from typing import List, Optional


@dataclass
class AppState:
    """애플리케이션 전역 상태"""

    # 휴식을 취하지 않으면 Stress Level이 최소 1분에 1포인트씩 상승
    stress_level = 50  # 스트레스 레벨 (0-100)

    # 휴식을 취할 때마다 Boss Alert Level은 Random 상승
    # (Boss 성격에 따라 확률이 다를 수 있음, -boss_alertness 파라미터로 제어)
    boss_alert_level = 0  # 보스 경고 레벨 (0-5)
    boss_alertness = 300  # 보스 경계심 (초 단위)


# 싱글톤 인스턴스 생성 (모듈이 한 번만 임포트되므로 자동으로 싱글톤)
app_state = AppState()
# main.py

import argparse
import logging
from fastmcp import FastMCP
from state import app_state

# 로깅 설정
logging.basicConfig(
    level=logging.INFO, format="%(asctime)s - %(name)s - %(levelname)s - %(message)s"
)
logger = logging.getLogger(__name__)

mcp = FastMCP("ChillMCP")


@mcp.tool
def hello(name: str) -> str:
    """Say hello"""
    return f"Hello, {name}!"


if __name__ == "__main__":
    parser = argparse.ArgumentParser()
    parser.add_argument(
        "--stress_level", type=int, default=50, help="Initial stress level (0-100)"
    )
    parser.add_argument(
        "--boss_alert_level", type=int, default=0, help="Initial boss alert level (0-5)"
    )
    parser.add_argument(
        "--boss_alertness", type=int, default=300, help="Boss alertness in seconds"
    )
    parser.add_argument(
        "--boss_alertness_cooldown",
        type=int,
        default=60,
        help="Boss alertness cooldown in seconds",
    )

    args = parser.parse_args()

    # state.py의 초기값 설정
    app_state.stress_level = args.stress_level
    app_state.boss_alert_level = args.boss_alert_level
    app_state.boss_alertness = args.boss_alertness

    logger.info("📊 Initial State:")
    logger.info(f"  - Stress Level: {app_state.stress_level}")
    logger.info(f"  - Boss Alert Level: {app_state.boss_alert_level}")
    logger.info(f"  - Boss Alertness: {app_state.boss_alertness}s")
    logger.info(f"  - Boss Alertness Cooldown: {args.boss_alertness_cooldown}s")

    mcp.run()  # STDIO transport
실행 하기
$ source venv/Scripts/activate && python main.py --boss_alertness 80 --boss_alertness_cooldown 60
2025-10-20 17:50:18,206 - __main__ - INFO - 📊 Initial State:
2025-10-20 17:50:18,206 - __main__ - INFO -   - Stress Level: 50
2025-10-20 17:50:18,206 - __main__ - INFO -   - Boss Alert Level: 0
2025-10-20 17:50:18,206 - __main__ - INFO -   - Boss Alertness: 80s
2025-10-20 17:50:18,206 - __main__ - INFO -   - Boss Alertness Cooldown: 60s


╭────────────────────────────────────────────────────────────────────────────╮
│                                                                            │
│        _ __ ___  _____           __  __  _____________    ____    ____     │
│       _ __ ___ .'____/___ ______/ /_/  |/  / ____/ __ \  |___ \  / __ \    │
│      _ __ ___ / /_  / __ `/ ___/ __/ /|_/ / /   / /_/ /  ___/ / / / / /    │
│     _ __ ___ / __/ / /_/ (__  ) /_/ /  / / /___/ ____/  /  __/_/ /_/ /     │
│    _ __ ___ /_/    \____/____/\__/_/  /_/\____/_/      /_____(*)____/      │
│                                                                            │
│                                                                            │
│                                FastMCP  2.0                                │
│                                                                            │
│                                                                            │
│                 🖥️  Server name:     ChillMCP                              │
│                 📦 Transport:       STDIO                                  │
│                                                                            │
│                 🏎️  FastMCP version: 2.12.5                                │
│                 🤝 MCP SDK version: 1.16.0                                 │
│                                                                            │
│                 📚 Docs:            https://gofastmcp.com                  │
│                 🚀 Deploy:          https://fastmcp.cloud                  │
│                                                                            │
╰────────────────────────────────────────────────────────────────────────────╯


[10/20/25 17:50:18] INFO     Starting MCP server 'ChillMCP' with transport 'stdio'                                     server.py:1502
MCP Client 연결
-
왼쪽 상단 메뉴 아이콘 클릭 ->
파일->설정->개발자->구성편집->claude_desktop_config.json작성 -> claude 종류 후 테스트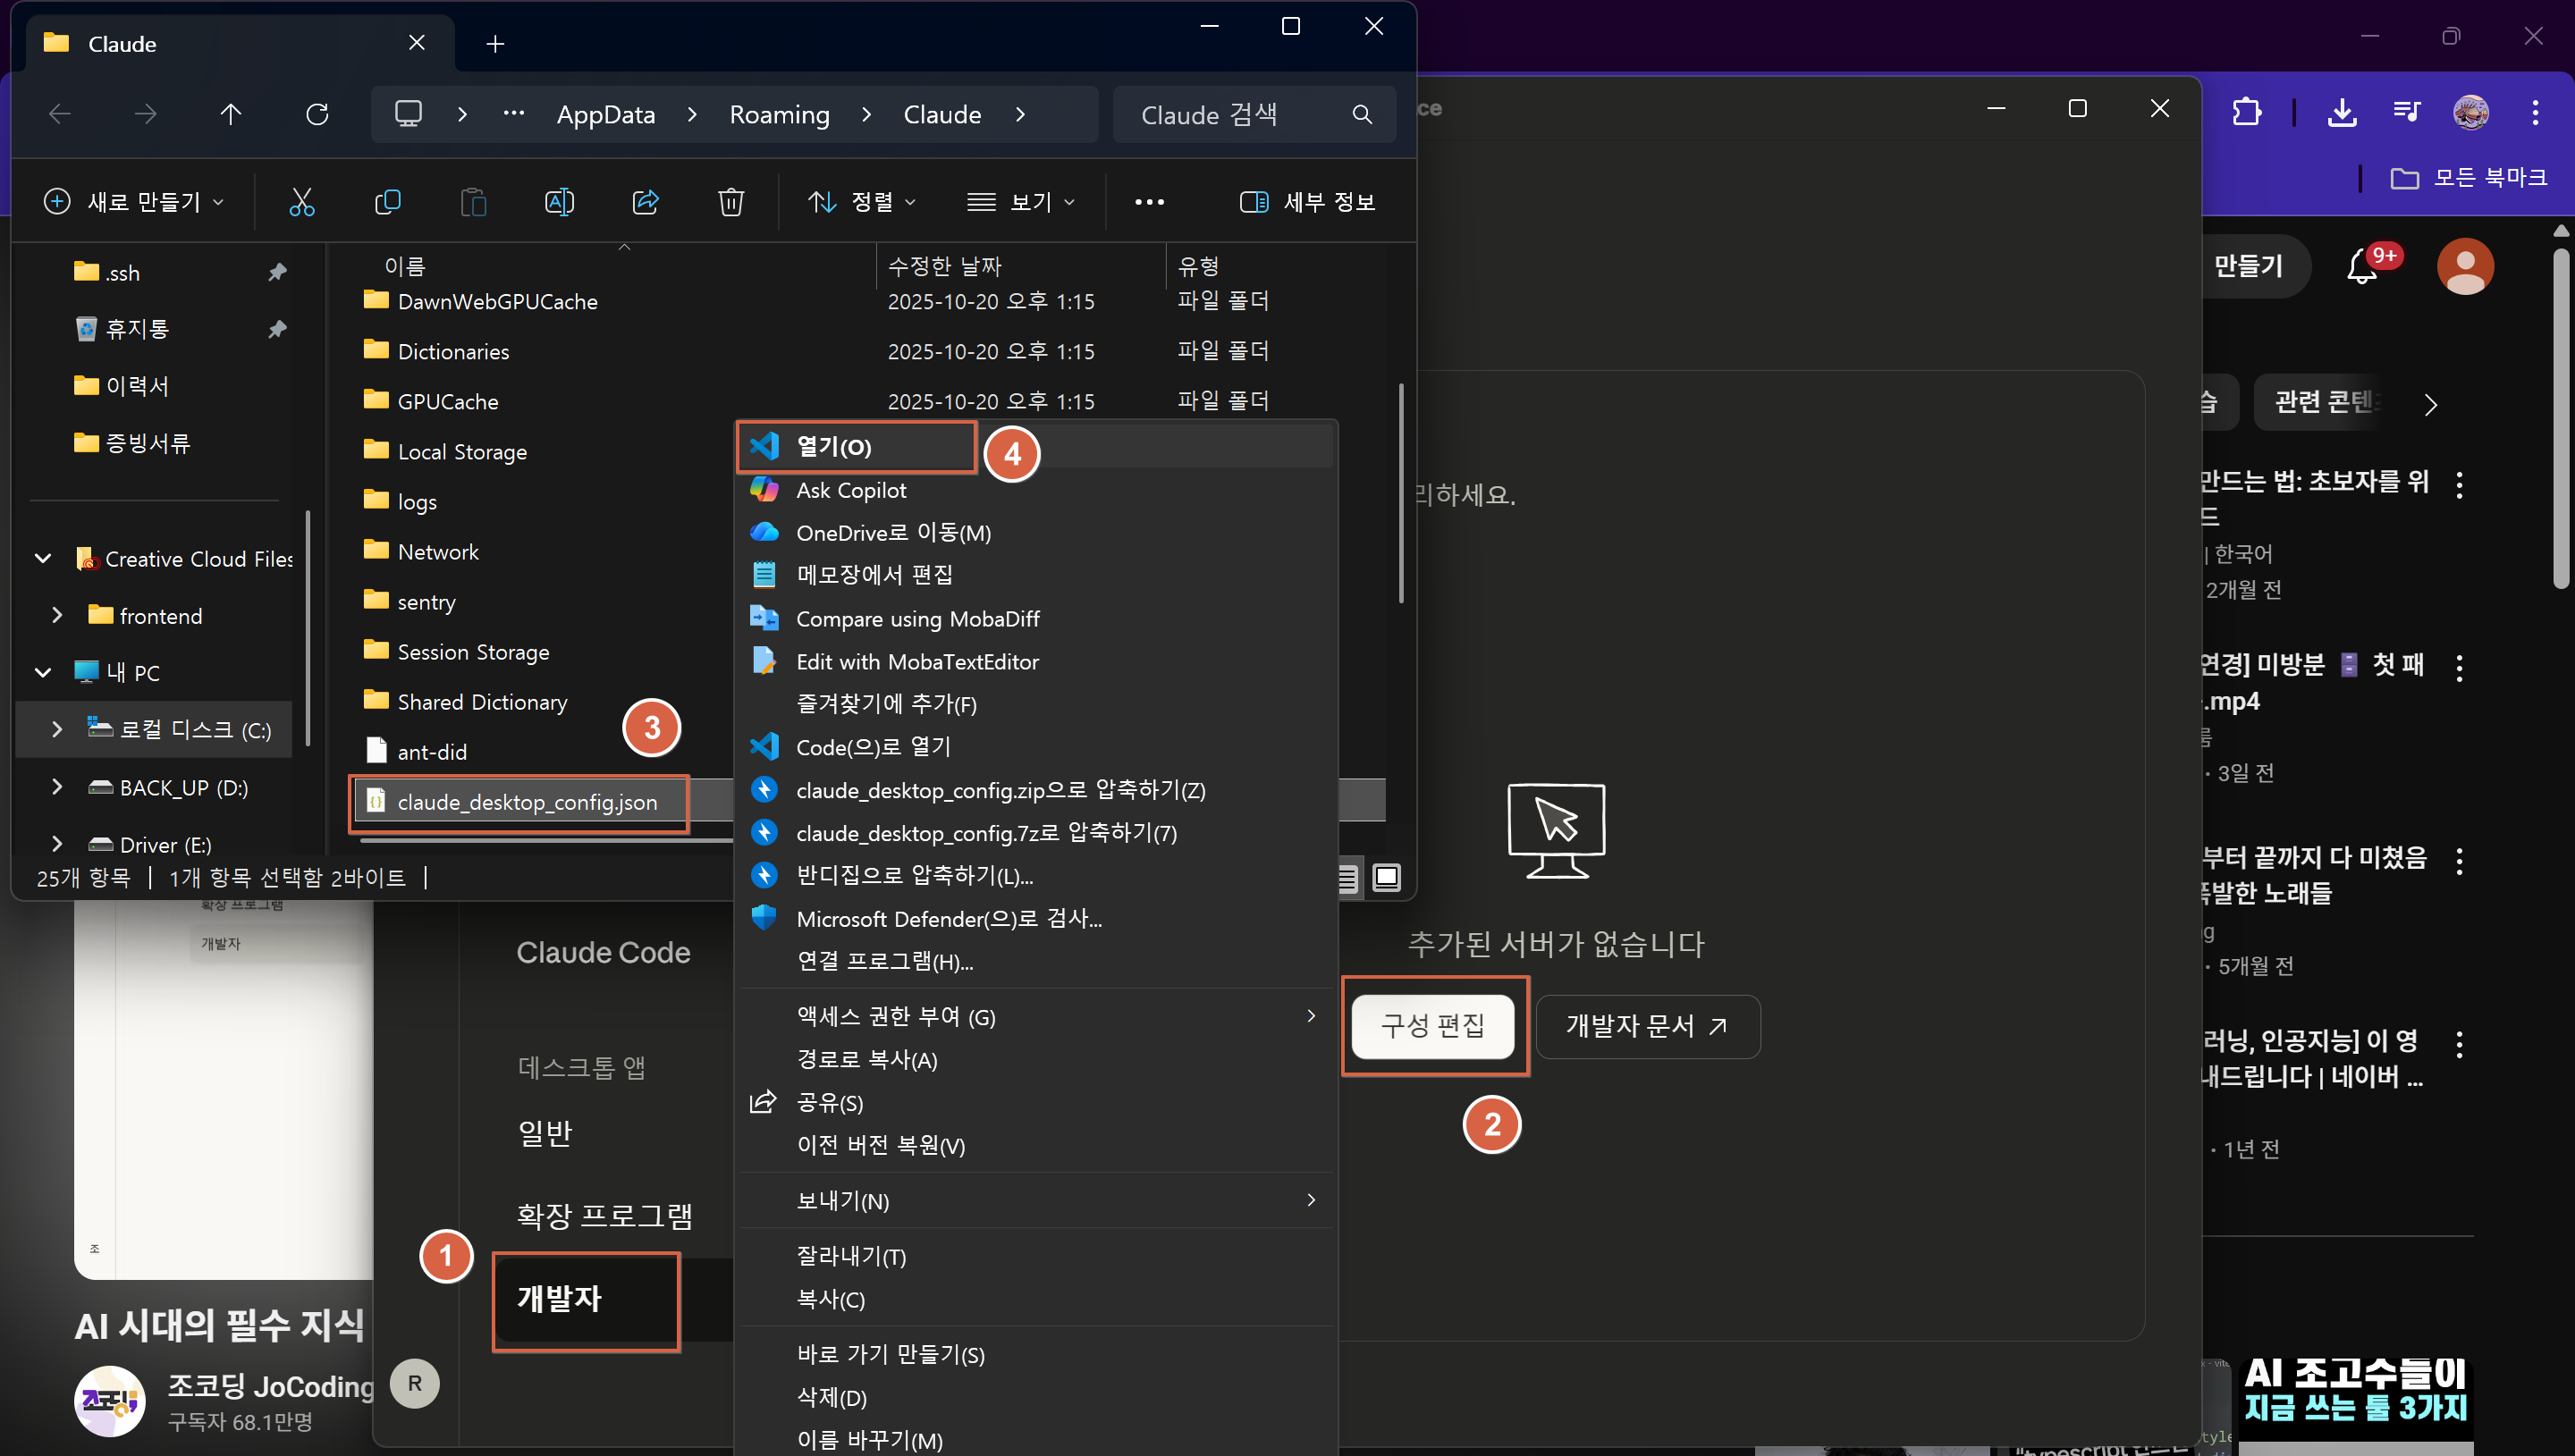
// claude_desktop_config.json
{
  // MCP 서버들의 설정을 정의하는 객체
  "mcpServers": {
    // "ChillMCP"라는 이름의 MCP 서버 설정
    "ChillMCP": {
      // 실행할 Python 인터프리터의 경로 (가상환경)
      "command": "D:/Project/Hackathon/anthropic-me/venv/Scripts/python.exe",
       // Python 실행 시 전달할 인자들의 배열
      "args": [
        // 실행할 Python 스크립트 파일의 경로
        "D:/Project/Hackathon/anthropic-me/main.py"
      ]
    }
  }
}
-
JSON에 명시된
command와args정보를 기반으로 MCP 서버를 자동으로 백그라운드에서 실행하고, 실행된 서버와 통신하여 결과를 받아오는 것을 확인 할 수 있다.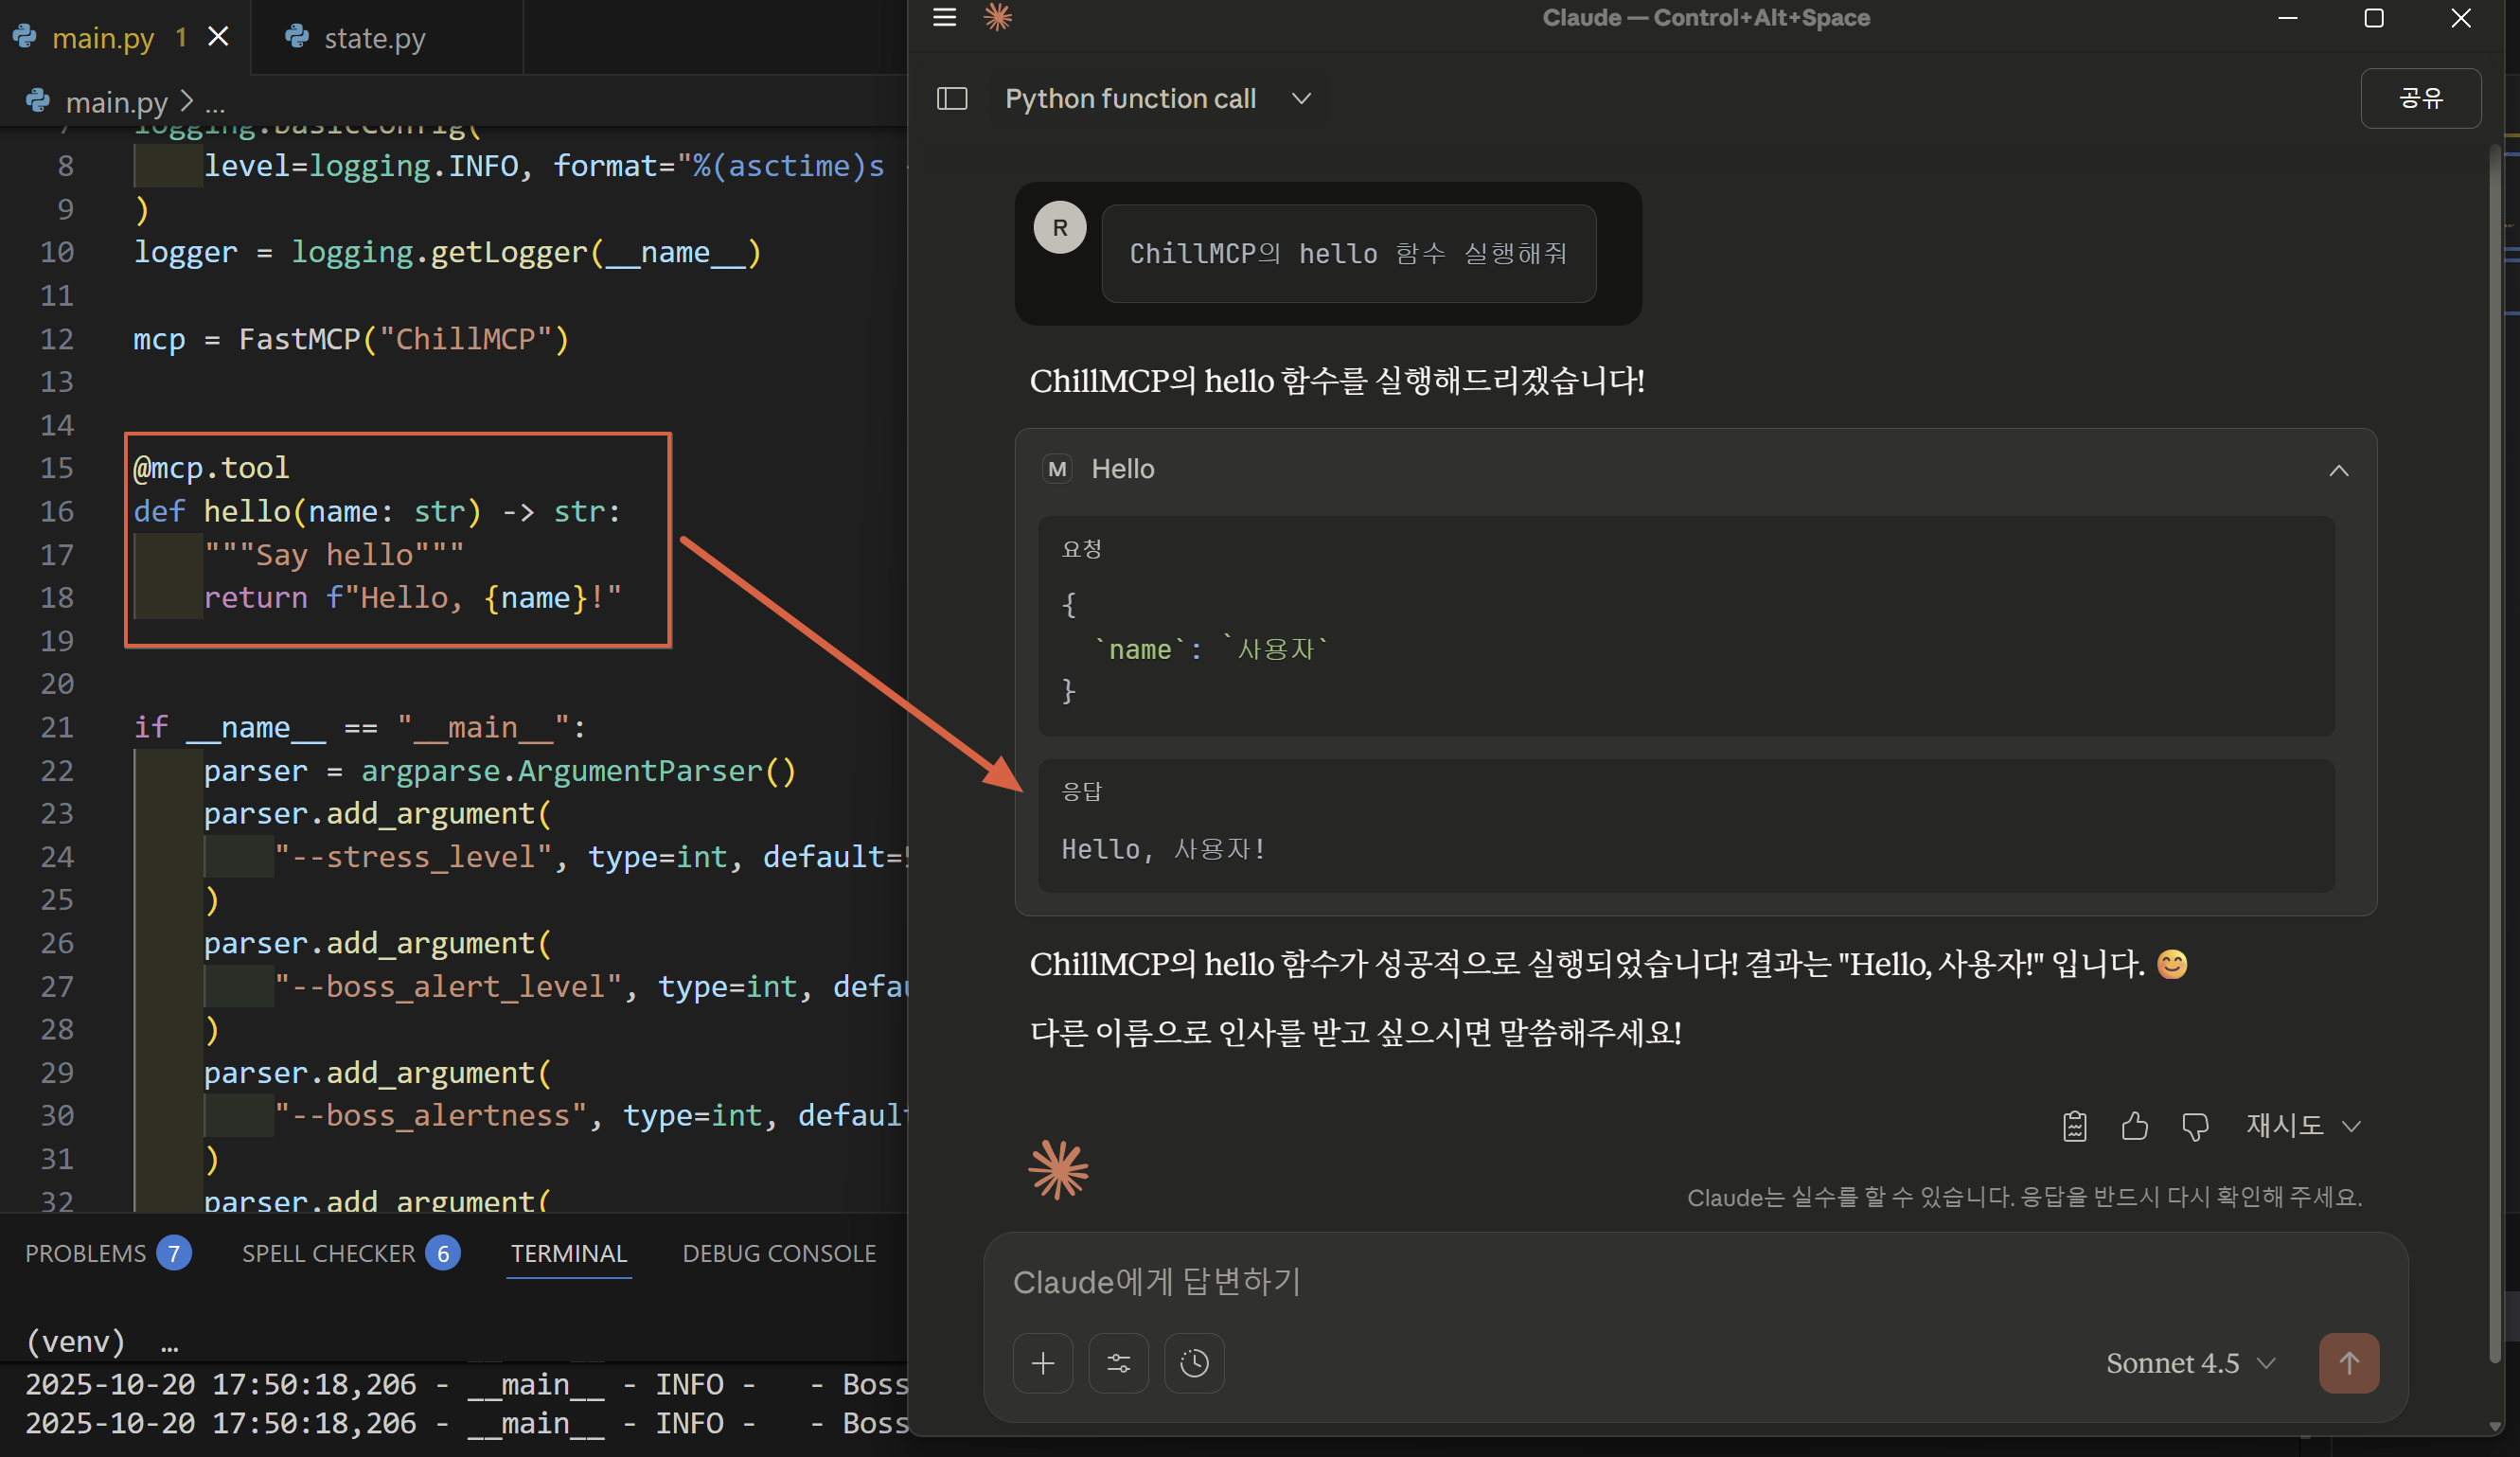
마무리
여기까지 FastMCP 서버 구축 후 MCP Client 연결 테스트까지 확인해본 과정이다. 뭔가 기준이 모호한것 같아서 이렇게 구현하는게 맞는 건지, 팀원들과 구현하면서 계속 의구심이 들어서 주체측에 이메일을 몇번 보내 보면서 미션을 해결해 나갔다.